Magnetic has the ability to integrate with Xero.
Before we get started with telling you more about how it all works, watch this video below:
How does the integration work?
Tax and Supplier Invoices, as well as Tax and Supplier Credit Notes, will be exported to Xero from Magnetic.
- If an item type does not exist in Xero, it will be automatically created the first time it is used in Magnetic. This will only update when you create an Invoice or Credit Note for that specific item type.
- The integration is 2-way integration, but only for payment statuses. Payment statuses in Xero will be synchronised with Magnetic which will make the payment status easy to view. Magnetic imports the payment status changes every 15 minutes. Having up-to-date payment statuses in Magnetic allows your account managers to see who owes you money without having to access the external accounting platform.
- Magnetic does exports to Xero in real-time. Real-time exporting means that accountants don't have to spend any time transferring credit notes, tax invoices etc. and have a live review in the accounting system of the business in Magnetic
- IMPORTANT: Your integration with Xero needs to have an active associated Magnetic Account, sharing the same email address to function correctly. If your account on Magnetic is de-activated, it will affect the functioning of your integration. You would then need to login to Xero and update your email address and once done, log back into Magnetic and redo your integration.
HOW TO SET-UP THE XERO INTEGRATION
***Note***Only managers or admins can access company settings page.
Step 1: In Magnetic, hover over your name. Click on Company Settings.

Step 2: Click on the Accounts accordion.

Step 3: Scroll down to your billing entity and click on the pencil icon to edit it.
Step 4: Scroll down to the accounts integration settings section, first set the accounting platform option to Xero.

Step 5: Ensure you have allowed browser pop-ups, as the Xero authorisation screen opens a new pop-up and won't do anything if not enabled.
Step 6: Set the Tax & Supplier Invoices and Credit Notes option to ‘Export’.
- You have a choice of Manual (you export manually) or Automatic depending on your preference.
- Currently, we only support Tax & Supplier Invoices and Credit Notes for export.
Step 7: You cannot change the base currency, but it's important to ensure that the base currency you see in your company settings exists as a currency in Xero.
- If you select ‘ZAR’ as the base currency, you need to ensure that ZAR exists in Xero as well. Once logged into your Xero account, you can go to Settings, and go to Currencies and Add Currency if it does not exist.
Step 8: Click ‘Authorise Xero Account’.
- This will automatically open a new tab for you to sign into your Xero account if you aren’t already signed into your Xero account. If you have followed step 5, proceed to step 9 otherwise go back to step 5 again.
Step 9: In the new tab, that was automatically opened, sign into your Xero account if not already signed in.


(The Xero tab will close automatically and your company settings page in Magnetic will automatically refresh now)
Step 11: Go back to the Accounts > Accounts Integration accordion.
- You will then see Xero Tax Type mappings.
- This will import all Tax Rates from the Xero organisation that has just been authorised.
Step 12: Specify all defaults and mappings.
- This means that when, for example, you use the 'Taxable' tax type on a line item, in Magnetic, it will match with 'Standard Rate Sales' in Xero, so when it is created in Xero, that tax type is used. Think of it as what will 'Taxable' or 'No Tax' be in Xero, and so on.

*These settings are examples - your tax type will be difference depending how they're set up in your Xero account.
Step 13: The Default Sales and Cost Of Sales Codes are used when creating items in Xero
- If nothing is specified, the "200 Sales Account" is used for sales codes. Be careful because the defaults may not always exist in your Xero account.
- If nothing is specified, the "310 Cost of Sales Account" is used for sales codes. Be careful because the defaults may not always exist in your Xero account.
- Specify historical tax mappings for 14% VAT (old rate)

Step 14: Click ‘Save’ to save your settings. See bottom of your screen and notice that your Xero account says ‘Active’, if not, please start the process again, from step 8 above.

Congratulations! You have successfully linked your Xero account to Magnetic!
You can also check your billing entity and see your Xero integrations status:

Please note:
Magnetic does not get involved with transferring your data from another accounting platform into Xero. We would always recommend an accountant be involved in the process to ensure the data is accurate, but we have some conversion partners listed here who might be able to help: https://www.xero.com/za/marketplace/app-function/s/conversions/1/?orderBy=LISTING_FEATURES
CREATING ITEM TYPES
There are 2 item types you will find:
- An item type that exists in Xero.
- An item type that does not exist in Xero.
Please note:
- ‘Sales’ codes (revenue related) and ‘Cost of Sales’ codes (not revenue related) seen in Magnetic have been automatically imported from the Xero account that is currently authorised. Item type codes are also imported from Xero.
- If no Sales Code is selected it will be set to the default of Sales 200.
- Cost of Sales has no default, therefore this will only be considered if you specify an item in this field
1. Add Item Types to Magnetic that already exist in Xero
Step 1: Go to the Accounts drop-down menu and Click ‘Item Types’
Step 2: Click ‘New Item Type’ on the Item Types page in the top left corner
Step 3: Go to Item Code and select an existing item code in Xero from the drop-down. This will create an item type in Magnetic that already exists in Xero, essentially linking the items. Alternatively, you can get the item code directly from Xero and enter it manually.
The sales codes seen in Magnetic - in the drop down - will be pulled automatically from the Xero account that has been authorised, for the sales portion of the item.

- ***Note*** Only set a 'cost of sales' code if this is an item that is purchased from a supplier and needs to be assigned to a cost of sales account

2. Create new Item Type in Magnetic that does not yet exist in Xero
Step 1: Go to the Accounts drop-down menu and Click ‘Item Types’.
Step 2: Click ‘New Item Type’ on the Item Types page.
Step 3: Specify the sales and/or cost of sales codes
Step 4: Leave Item Code blank.
Step 5: Save
***Note***This will be seen in Xero only when you create or edit the next invoice or credit note after the Item Type has been created.
EXPORTING INVOICES AND CREDIT NOTES
First create a new tax invoice by following the steps below:
Step 1: Go to Tax Invoices page by going to Accounts drop down and Clicking ‘Tax Invoices’
Step 2: Click ‘New Tax Invoice’ in the top left of the screen
- Ideally create a contact beforehand (this way you can add more information to a contact or company) although you can create a new contact in the new tax invoice if you have the permissions to, you will be restricted to the name for a company and a name and email address for a contact.
Step 3: Search for the contact in contact field and select contact.
What exactly is exported when a contact is created in Xero?
- Contact Name: Company Billing Name otherwise Company Name.
- Contact Person Name: Contact First Name + Contact Last Name.
- Contact Person Email: Contact Email (Default: “missing@email.com”).
- VAT #: Company Tax Number.
- Postal Address: Company Postal Address.
- Physical Address: Company Physical Address.
- Is Customer: Approved Customer on Supplier Invoice/Supplier Credit Note.
- Is Supplier: Approved Supplier on Tax Invoice/Credit Note.
Step 4:
Search company in company field and select company.
- If the client is not approved they will not appear when you are searching for contact or company in their respective fields
- Contact and Company fields will go grey as seen below when an existing company, in Magnetic, is selected.
- If these fields are white then an existing contact or company has not been selected
***Note*** If 'only approved companies’ in accounts is set to true on the company that you want to issue the invoice or credit note to, then you need to have permission to create new companies otherwise you can only select an approved company
***Note*** To decide whether a company can be approved or not you need to be an account admin - If you have permission you can go to the company and set it to ‘Approved’, alternatively you can also create the company when searching as well.
Step 5: Select a Job - this has no effect on the export as no job-related data is used.
Step 6: Fill out the fields.
- Add a title.
- Select Issue Date (which will be the date shown in Xero)
- Select Payment Date (seen as the due date in Xero)
- Add a description - this will be exported to Xero.
(If ‘Payment Date’ is not specified it will determine the due date from the terms of payment in Magnetic e.g. if terms of payment is 21 days in Magnetic it will add 21 days to issue date).
Step 7: Add items in line items at the bottom of the screen, you can add multiple lines by clicking on the add icon (The item's name will be used as the name in Xero otherwise the description for each line will be used as the item name in Xero) and make selection under tax type drop-down on the right of each line item. Remember the mappings we started off setting earlier - this is where that comes into play.

- The item type you created will be exported based on the item type you have selected above.
- The details per line item will also be exported through to Xero.
- Xero does not have per-line markup as seen in Magnetic, therefore the value sent through to Xero is inclusive of markups.
- Discounts in Magnetic will be for the entire invoice instead of per line, in Xero each line will specify the discount.
Step 8:
Click ‘Save’ Tax Invoice
- Once you click save, it will now be exported to Xero.(If manualy exports is chosen you would need to export manually) If there is a failure you will receive an in-app notification. The errors are also saved for each account when the icon is red or orange - this will be explained below.
- There are 3 different Magnetic export states for Xero.
- Red:
- Possibility 1: The account has never been exported to Xero before - doesn't exist in Xero
- Possibility 2: The account has tried to export but contained errors - doesn't exist in Xero. You can view the errors when hovering over the red icon.
- Orange: It has previously exported successfully to Xero, BUT the last attempted export contained errors. This means that there may be a mismatch between the accounts in Xero and Magnetic. You can view the errors when hovering over the orange icon.
- Green: The account has been successfully exported to Xero. You can view the account Xero by simply clicking on the green icon.
- These icons appear as the very first column in the individual account list pages, as well as, the accounts list page. If you cannot see them, ensure they are visible in the table drop-down on the right-hand side.


- You can also access Xero from Magnetic, by clicking on the export status icons, and access Magnetic from Xero as seen below:

Magnetic also allows you to export an account that either has a red or orange icon to Xero, by simply clicking on the re-export icon when hovering over an account in the list pages.

Magnetic also allows you to manually set an account, that either has a red or orange icon, as exported. Xero has numerous restrictions which cannot be resolved - at least not by the integration. Due to this Magnetic allows users to use this. Magnetic will firstly search for a matching account and then compare totals to ensure that there aren't any vital mismatches occurring.

Below shows how the Magnetic statuses map to those in Xero:
| Magnetic Status | Xero Status |
| Draft | Submitted |
| Issued | Authorised |
| Cancelled | Voided/Deleted |
| Part Paid | The total of payments paid, in Xero, is less than the amount due. |
| Paid | Paid (The total of payments paid, in Xero, is equal to the amount due) |
| Credited | Authorised |
| Part Credited | Authorised |
Below shows how the Xero statuses map to those in Magnetic:
| Xero Status | Magnetic Status |
| Submitted | Draft |
| Authorised | Issued, Part-Paid, Paid, Credited or Part-Credited |
| Cancelled | Voided |
| Paid | Paid |
The following only applies to South African companies:
Magnetic caters for the new South African VAT increase to 15%, in order to check whether your company's Xero settings are up-to-date, follow the steps below:
- Open up the Accounts accordion, and scroll down to Accounts Integration Settings block.
- Towards the bottom of the block, you should see a Historical Tax Mappings block.
- In this block, you are able to set which tax mapping you want, for any account that doesn't have 15% in the tax field displayed on the account item.
- For example: If a tax invoice is created with 14% tax (see image below), the historical tax mappings (as seen further down) will apply to all taxable line items.

- All South African companies' default tax percentage has been automatically changed to 15% for all new account items.

Common problems faced and how to fix them:
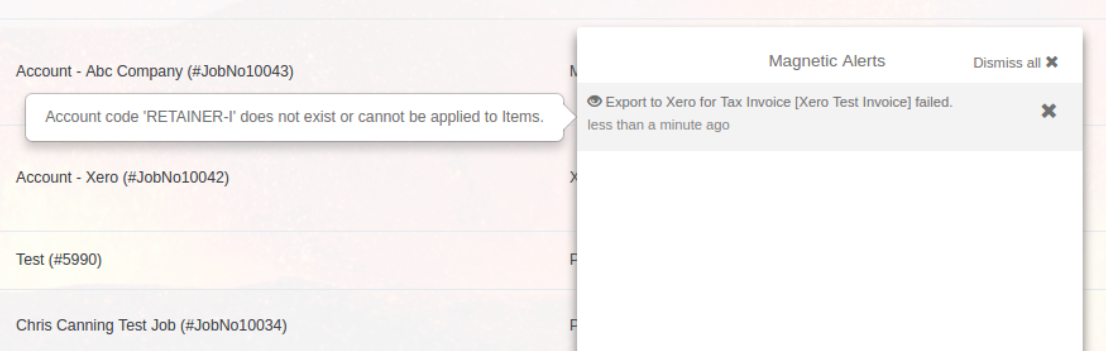
1) Xero ‘account code does not exist or cannot be applied to Items’ error:
This error happens when a user exports an invoice/credit note to Xero - by saving or editing, but one or more of the item types that are specified in the line items have incorrect sales, cost of sales and item codes - those that don't exist in Xero.
Don't worry, fixing this is easy, but first, it's important to understand why it is happening and what causes this error.
Why does it happen?
When an invoice is exported from Magnetic to Xero, it needs to match up the codes (in order to know which item in Xero belongs to which item type in Magnetic), before it can proceed. If it happens that a selected item type is found, which has a code that doesn’t exist in Xero, it will give you the following error below. With that said, an account with code ‘RETAINER-I’ does not exist in Xero.
Below is what the problematic item type’s sales code looks like. As you can see this is where the error is.

1) In Magnetic, under Item Types, search and find the problematic Item Type. You will need to go through each line item's item types if you are unsure where the problem is.
3) Select one of the existing accounts from the drop-down and click Save.

** PS: Just remember that this issue can happen with the cost of sales and item code fields as well, so just repeat the process for each field or all 3 code fields, where necessary.
Old item types that had previous (outdated) sales, cost of sales, or item codes set before.
Deleting item/s in Xero and not deleting them in Magnetic.
Manually setting the sales, cost of sales, or item codes if no Xero authorisation has been done or the Xero authorisation has been removed, as the sales, cost of sales and item code fields change from a drop-down field to a plain text field where the user can type in
2) Invoice not of valid status for modification. (Cannot go from say Issued to Draft or make changes to Paid Invoices)
This error is caused when an invoice being exported has already been exported to Xero and is marked as void, paid or part -aid or has another unmodifiable status. To resolve this issue, locate the invoice in Xero and manually update the invoice on Xero.
3) Invoice # must be unique. (Invoice was voided)
A manual edit is the one way to resolve this issue.
4) Invoice not of valid status for modification. This document cannot be edited as it has a payment or credit note allocated to it. (A payment/s were added in Xero)
This error message will occur when you are attempting to export an invoice that has already been exported to Xero and is marked as paid or part-paid in Xero. Please note that Xero will NOT allow invoices, that have been marked as paid or part-paid, to be updated or changed.
A manual edit, in Xero, is the one way to resolve this issue.
5) The description field is mandatory for each line item.
To resolve this problem, ensure all line items for a credit note have descriptions.
It is important to note that, description fields are automatically populated from the item type selected on the line item - if one exists. They can also, however, be edited manually per line item.
Once all problematic line items contain descriptions, this problem should be resolved.
6) Xero removal of users or Magnetic add-on will cause an issue with the Xero Integration on Magnetic.
Don't worry this is fairly uncommon but possible. Any possible changes to users in Xero should be communicated to us prior to avoid any potential issues.
7) No Xero currency for [CURRENCY] exists. Please first add [CURRENCY] to the currency list in Xero and then try again.
You need to add the matching currency that appears on the invoice or credit note, in Xero as well. So if you have selected USD on the invoice or credit note, then you need to add USD in Xero so Magnetic can easily match the currencies when exporting.
If you are not sure as to how to add currency in Xero, view: Add Foreign Currency in Xero.
** [CURRENCY] refers to the selected currency on the invoice or credit note, such as USD, GBP, and so on.