With Magnetic you can run your entire agency off a single app, including your accounts. You can create cost estimates, invoices, purchase orders, credit notes etc and also pull reports on various activities. You can also create your own custom headers and footers. We integrate with Pastel and Xero and Sage One
Follow these simple steps to set up your accounts module:
- Hover the mouse over your name.
- Click on Accounts.
- Scroll down and click the "pencil" icon to edit the entity,
- Add your billing entity settings
- Scroll down to choose the Accounting platform from the dropdown e.g Pastel or Xero or Sage (if applicable)
- Follow the steps for integration
- Save when done
See the screenshots below: 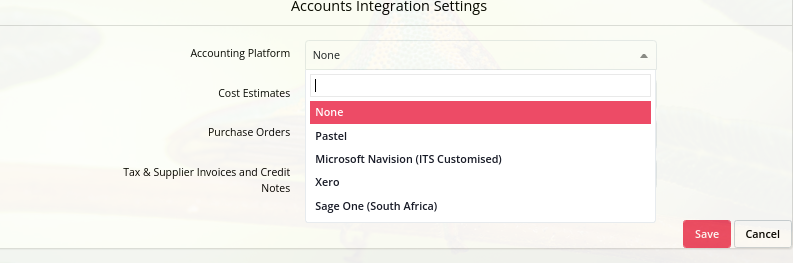


7. Please note the following additional account setting options below:
- Tickbox - Only Create Accounts Off Cost Estimate: Only create new Tax invoices, Supplier invoices and Purchase orders of a CE. Enable this to ensure that Tax Invoices and Purchase Orders are based on an approved Cost Estimate from a client. This stops invoices and purchase orders being created for random values not agreed by the client but then requires you to first have an approved Cost Estimate before you can create the extra documents.
- Tickbox - Only Approved Customers and Suppliers can be billed: This allows account administrators to determine which companies can be billed as either a customer (Tax Invoice) or a Supplier (Supplier Invoice) Use this option if you want to have central control in the Accounts department most likely on who can be invoiced. You may require clients to go through a credit check before you can do business with them. This also stops Purchase Orders being able to be issued to Suppliers that aren't approved and where you can then become liable for payment.You can easily view all approved customers and/or suppliers by viewing contacts / companies and checking the box for only show approved customers or suppliers. See tutorial: Adding Contact/ Companies.
- Account Reference Code Prefix: This prefix will be added to all your generated accounting notes. Set your accounts prefix if you want account numbers to begin with a specific word, i.e MAG001.
- Text footer: you can add a footer text instead of designing and uploading a footer as well. Type in the text in the "Accounts Footer TExt" box aboce the Payment Terms.
- Next Number: Set your starting numbers for all accounts. For example, when you are operating from another accounting platform and want sequential numbers.
- All accounts have the same header but can have different footers for CE, Tax invoice, Purchase order and Credit notes.
- BCC sent accounts: Use this to keep an electronic copy of all accounts communication in your own email system. Setup a rule that automatically archives these emails. If you are using G Suite/Gmail you can send to an address yourname+magneticinvoices@yourdomain.com and create a rule for that address. All emails sent to that address will go to the address yourname@yourdomain.com (a nifty G Suite / Gmail trick).
- Payment Terms: Click on the plus sign and manually type in the payment terms you want. Once you have created your set of payment terms, you can also select default payment terms per company if required.

8. Set your accounts headers and footers for Tax Invoices, Cost Estimates, and Purchase Orders. (Image size to be 1640 pixels wide to ensure better quality.)

Example of an Accounts Header:

Example of an Accounts Footer:

Example of a CE Footer:

Also see: